
Here it is: the reason for the blog and why it’s here. My take on perfect roast potatoes.
Perfect for me means golden nuggets: crunchy, shiny outside and ivory fluff inside.
One of the key components to a roast dinner being truly memorable is perfect roast potatoes. I’ve spent a long time eating and cooking roast potatoes, and have tried all the methods from all the chefs – Heston Blumenthal, Delia Smith, Jamie Oliver, the lot. In 2009 The Guardian published an interesting article comparing different celebrity chef techniques. Many spuds later I feel somewhat qualified to give the perfect potato.
the potatoes
First, the potatoes. You need lovely dry-matter-packed potatoes, such as Maris Pipers or Yukon Golds. Peel them but keep the skins, in a muslin cloth or brand new J-cloth tied at the top. This may sound bonkers but these peelings will lend a real earthy note to the final product. Cut the potatoes into golf-ball size chunks. Get some water on a really rapid boil and salt much more than you usually would. When you reach your salting limit, add a touch more (this is more chemical- than taste-based). Pop your pots in the water and dunk the skins in too.
the boiling
Leave to boil until tremendously tender – up to but not as far as potato soup. This is a test of nerves. Drain and return to the pan to steam-dry, discarding the skins. If you dare, shake the cooked potatoes a little to break the edges.
(The potatoes can be frozen or fridged at this point, leaving you free to do the actual roasting when you’re ready.)
the roasting
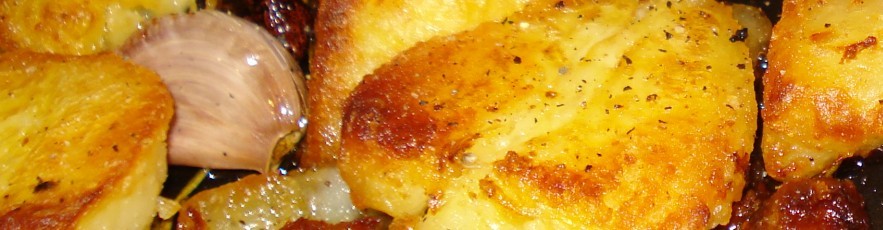
When you’re ready to cook, get the oven dead hot, around 220C. Pre-heating is the order of the day – don’t put the potatoes in then turn the oven on. Give it at least 10 minutes to reach the optimum temperature. A couple of minutes before the potatoes go in, add your fat of choice to a large baking tray. I favour a 50/50 mix of pork and duck fat. I add enough to barely cover the base of the tray. Put this back in the oven to get smoky, wibbly hot. At this point add the potatoes to the fat.
the seasoning
After 20 minutes, take the tray out, add a sprig of rosemary, a couple of bashed (no need to peel) garlic cloves and a few splashes of red wine vinegar. Add a slice of orange zest if you have it. Take a fork and gently press on the back of each spud. You want them crispy, right? That’s formed by the crags on the potato opening up, so this squishing makes as much surface area as possible. Try not to break them up, but if you do you get the by-product of little crispy bits in the tray. Season with salt and pepper here, toss it all together and pop back in the oven.
After another 20 minutes they will be approaching done. Keep tossing the potatoes in the oils and flavourings when you check on them, and pop them back in if you think they could do with a few more minutes. When they come out of the oven sprinkle over some crumbled flakes of delicious Maldon sea salt.
It sounds like a lot of work when you read it all back like that, but it makes the most fluffy-centred, crunchy and gravy-absorbent roast potatoes you can imagine. Give them a try on your next roast!
praise for perfect potatoes the Big Spud way
“One of the gang cooked roast potatoes for their future in-laws …they were the best Roasties they’d ever eaten” – Love Potatoes
“Made them for family and my sister apparently hasn’t stopped going on about them since.” – @lukewhitt_
“Big Spud’s guide to perfect roast potatoes is absolutely excellent” – She Cooks She Eats
“Tasted brilliant” – Munchmun.ch
further potato reading
If you’d like to read further, I can recommend some potato-centric blogs:
The Daily Spud – this keen Irishman talks about little else!
Best Sunday Roast – A roundup of all different Sunday roasts, of course featuring many roast potatoes.
No More Recipes – an excellent blog with some tantalising photographs.
If you have links to other potato-friendly blogs please let me know in the comments – I’d love to check them out!

Excellent bit of roasty research there Gary. Top marks. I like the peelings idea.
I have to say, even though it’s not even 7am yet my mouth was watering reading this :)
Thanks Jan. It’s hard work eating all those potatoes in search of perfection!
I do them the same way except for the red wine vinegar – will try that this Christmas!
I love this part “Leave to boil until tremendously tender – up to but not as far as potato soup. This is a test of nerves” – so true! But it’s worth it – so worth it.
None of the semolina coating nonsense by Nigella is necessary if you treat your spuds properly :)
The semolina thing is OK and make a nice change with pleasant nutty notes. But this page is all about roast potatoes in their purest form!
Yes, similar to how we do it too!
YUM!
Nice to have the technique confirmed by another potato pro :-)
‘smoky, wibbly hot’ – love that description. I’ve never tried the red wine vinegar either – will deffo give that a try with my Christmas bird.
The red wine vinegar is a Jamie Oliver master stroke. It’s hard to judge the amount, but it’s not a lot. It creates this lovely aroma and slight tang in the finished product that’s not obvious but missed when it’s not there. It’s close to chips from the seafront that have that vinegary kick wafting off them, but nowhere near as strong.
Try it out!
Hello fellow cold roast tatty fan :-) I put the spud peelings in the par boiling water and it definitely makes a difference to the flavour. This is such a comprehensive post – brilliant!
Cold – hot – I’m easy!
Thanks for stopping by.
these sound brilliant…….
If you give them a try, let me know how you get on!
Pingback: munchmun.ch » Roast Potatoes and Red Wine Vinegar
Pingback: jean christophe novelli’s roast potatoes « roast potato
i thought yukon gold had been rejected by Blumenthal and his team of chefs when they were taste testing. did i miss something?
A strange one this: I do remember them saying that on the programme (haven’t seen it in a little while) but the cookbook lists them as ones to use. He has also said at other times that Yukon Golds are worthy. So I don’t know where that discrepancy comes from.
Pingback: roast pork « roast potato
amazing!!!
well, I dunked the skins – and have to admit I did think it sounded bonkers – but these are the most gorgeous roasties with a taste I’ve never managed to get before. Didn’t add the red wine vinegar this time. They were well worth the effort – thanks
It does sound insane, doesn’t it? Well worth every crazy minute though.
Pingback: E-bike
Pingback: roast turkey with all the trimmings | Big Spud
Pingback: heston blumenthal’s roast chicken | Big Spud
Arran victory = roastie heaven!
Arran Victory are a great, great spud!
I dont like to cook them til theyre nearly collapsing cos i find they go too far over and all break up and absorb too much oil. Ive had great results by half cooking them in very salty water (like you say, spud) then shaking in the pan after draining to fluff, and letting them go properly cold in the colander as they drain. Then put them in with the chicken for a good hour and a half at least on v low in only the small amount of butter and oil that leaks out of my chicken under-skin-butter-basting and just turning them and basting every 20 mins or so. (Salt them with good flaky sea salt to help the crust) They hold together nicely in the middle and are fluffy but not soaked with oil in the middle, and the long slow cooking and basting with the chicken juices builds up a gorgeous dark glaze on the edges that fast cooking doesnt achieve as well. They’re amazingly good for a surprisingly low effort. I get the idea of cooking with the skins for flavour – I have in the past experimented with this idea by giving ole spuds a good scrub, and then scrappily peeling them to leave about half the peel on – they look like dalmation spuds! This allows for half the skin flavour to be preserved (and eaten – good for your fibre!) but leaves spots that are properly peeled that can absorb flavour and get fluffy and crispy. It does kinda work but i prefer my spuds to have the chickeny butter glaze!!! Nooomie nums!!!
I love potatoes ‘basted’ in meat juices as well, but I find you lose those crispy edges which are what I’m after. Horses for courses though.
it might work “frothing” them after the last base. Y’know, like when you sprinkle a bit of flour over them to aid the crispyness. Might work, dunno. Might try it next time.
I see it says to keep the peelings back but does it say what to do with them, have I missed that part? Another commenter says it is a great idea but wondering where they saw it being implemented!!
“Pop your pots in the water and dunk the skins in too.” Put the skins into a piece of muslin cloth (or a clean dishcloth), tie the top and boil them along with the potatoes. Let me know how you get on!
As I don’t possess any muslin, I boil the peelings first (they only take about ten minutes as they are so thin) then remove them from the pan with a slotted spoon. Then pop the tatties in. Again, I don’t like to boil them to the point of collapse, but just so that the edges are breaking up. A gentle shake is all it takes to roughen them up enough to get crunchy roasties but avoids “roasted mash”!!
Great tip Conan!
Lovely blog – looking forward to reading my way through it :)
Thanks K! Please comment on anything you find interesting :-)
Pingback: Recipes For Runners: Beetroot Salad by BigSpud « Jesus was a Road Runner…
I looove roast potaotes and I could eat them for dinner and nothing else. I have to confess I have more of a sweet tooth than savoury but I love roast potatoes (and mashed potato). Your instructions are very clear and understandable, however, my partner calls me “Disaster Chef”, so – it would be quite an achievement for me to follow your recipe! Also, here Down Under (Australia) we have different spuds, but I’ll certainly look for some dry-matter packed pots down under here and there. :)
Thanks a lot. Give them a try and let me know how you get on.
Pingback: Harvest of the month: Potato | Science on the Land
Pingback: pinot grigio potatoes | Big Spud
Pingback: Heston Blumenthal’s Christmas Dinner recipes : In Search Of Heston
Pingback: How to cook on Christmas Day
Pingback: dry-brined turkey with orange | Big Spud
Pingback: How to cook on Christmas Day | She Cooks, She Eats
Great pictures. Looks good.
Thanks! Probably my favourite food photos I’ve ever taken.